How to Save HEIC as JPG for Event Photo Sharing
After an event, the photo work often looks finished until the first attendee tries to open the gallery. The images look excellent on the photographer's iPhone or Mac, but someone using an older laptop, a Windows workstation, or an Android phone may see an unsupported file or an empty preview. At that point, how to save HEIC as JPG stops being a minor file-format question and becomes part of the attendee experience.
The reliable approach is to treat conversion as one stage in a delivery pipeline. Capture and archive the original HEIC files, create carefully managed JPG copies for sharing, preserve the metadata your gallery needs, and verify the result on more than one device before sending the event photo sharing link.
Why Event Galleries Still Rely on JPG Delivery
A gala photographer can finish a portrait set, upload the files, and send the gallery link before leaving the venue. The trouble starts when attendees open it on different devices. One guest sees no preview on a work laptop, another cannot download the files into an older editing application, and someone else asks for a version that opens on a phone without extra software.
That gap separates capture efficiency from exchange compatibility. HEIC keeps modern Apple workflows efficient, but JPG remains the safer format for broad delivery. JPG has supported digital devices, software applications, and online services since its 1992 standardization, as explained in this overview of the HEIC and JPG compatibility trade-off.
Apple's format change brought the issue into everyday event production. HEIF and HEIC support arrived at Apple's developer conference in June 2017, followed by iOS 11 and macOS High Sierra in September 2017. Compatible iPhones beginning with the iPhone 7 generation used HEIC as the default camera format, while macOS High Sierra added native desktop support during the same month, according to this history of how HEIC-to-JPG conversion became mainstream.
The last mile matters
The production team controls capture and upload. Attendees control the final viewing device. That last mile includes personal phones, office computers, messaging apps, social platforms, printers, and content management systems. A gallery can look correct during production yet create problems when recipients download, repost, print, or edit the images.
JPG reduces those delivery risks:
- Universal opening: Recipients can view JPG files in most environments without installing a specialist codec.
- Simple sharing: Websites, messaging apps, registration follow-ups, and social platforms commonly accept JPG without extra processing.
- Fast handoff: Organizers can provide sponsors, speakers, volunteers, and attendees with files that fit existing workflows.
- Lower support load: Fewer recipients need instructions for changing device settings or installing extensions.
Conversion should also preserve the information that makes a gallery usable. Check metadata such as titles, keywords, location fields, and capture details. Confirm that the exported JPG retains the intended color profile, because a file that opens everywhere but displays inaccurate color still creates rework for the photographer and confusion for the client.
Practical rule: Keep HEIC for efficient capture and archiving, then create JPG delivery copies when the audience or its devices are unknown.
Converting every file immediately is unnecessary when a gallery platform decodes HEIC reliably and attendees only need browser viewing. JPG becomes the safer delivery layer when people must download, repost, print, or move images through mixed systems. A workflow built around event photo distribution should make that format decision before publication, then test representative files on the devices the audience uses.
Native Conversion Workflows for Mac and iPhone
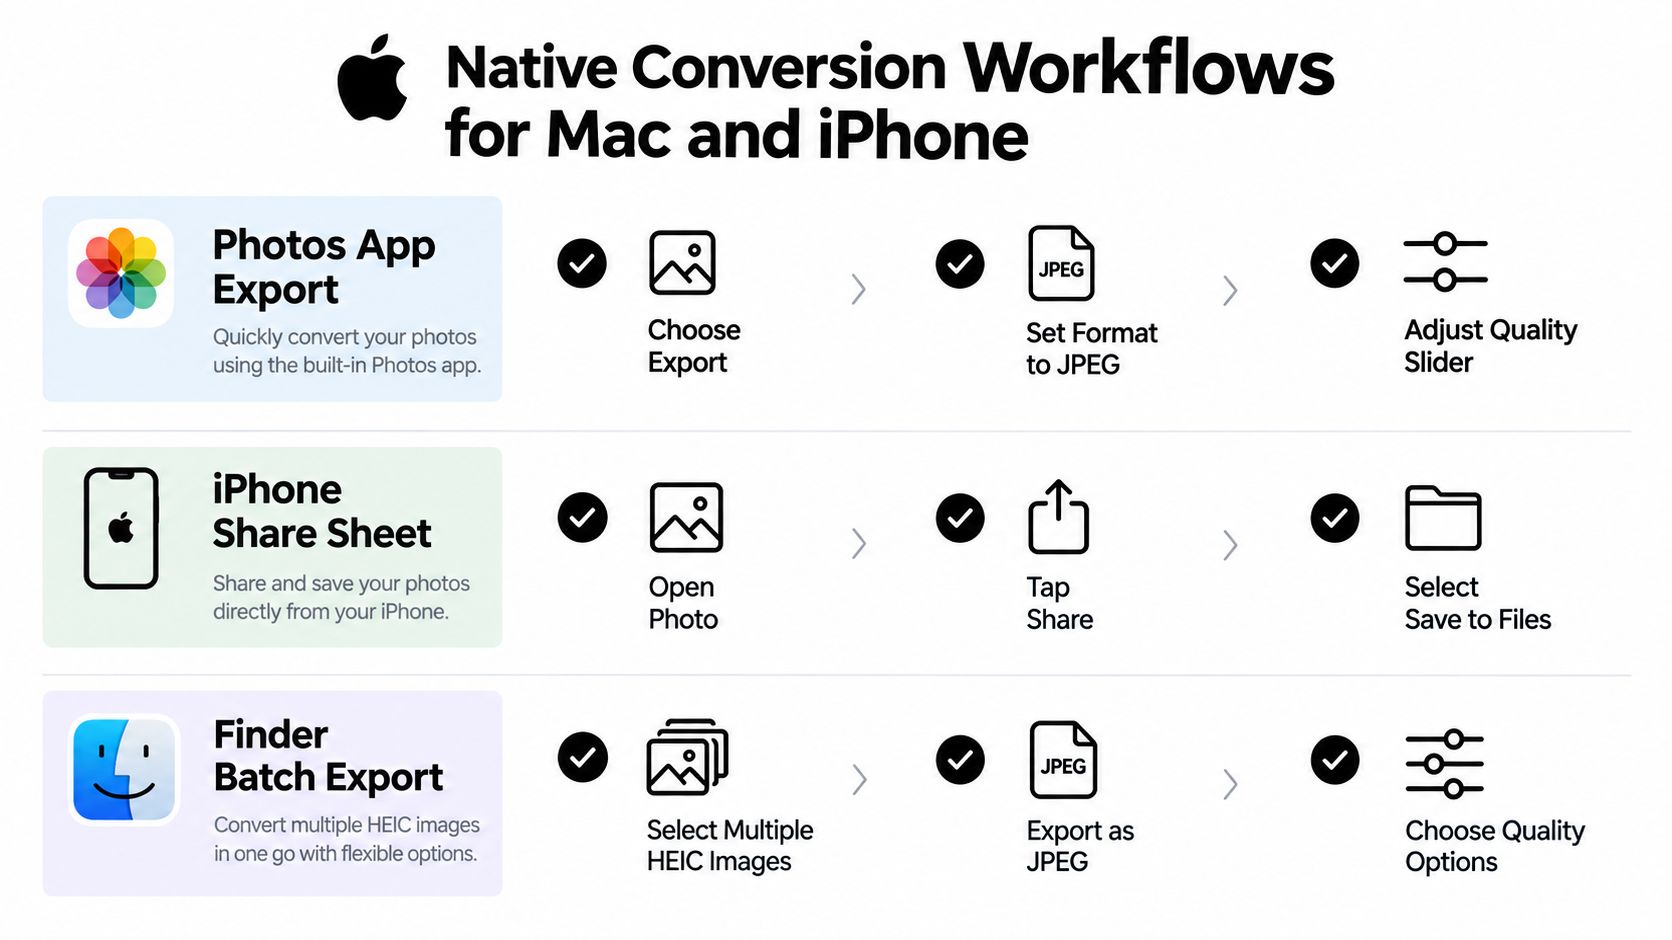
Apple users can handle many event batches without installing a converter, but the export settings deserve attention. The quickest method isn't always the safest method for metadata, color, or file naming. Start with a small test batch, open the resulting JPG on another device, and confirm that the fields your gallery depends on are still present.
Exporting from Photos on Mac
For a controlled export from Photos, select the event images, choose File, then Export, and select the option for exporting photos. Set the file type to JPEG and choose a high quality level. If Photos offers an option to include title, keywords, and location information, keep it enabled when those fields matter to sorting or search.
Export the files into a new delivery folder rather than mixing them with the library originals. Use a folder structure such as Event Name / JPG Delivery / Gallery Set and keep the HEIC files in a separate master location. This makes it harder to overwrite the source while renaming, resizing, or uploading the copies.
Photos drag-and-drop can be misleading because it may not expose the original HEIC file in the way a conversion workflow expects. Adobe discusses both the quality loss associated with JPG and the need to choose appropriate conversion settings in its guide to converting HEIC files. If a dragged file behaves unexpectedly, export from Photos or work from the original files in Finder instead.
Converting existing images on iPhone
On an iPhone, select the images in Photos, tap Share, and choose Save to Files. In Files, locate the exported images, select one or more files, open the contextual menu, and use Quick Actions, followed by Convert Image, then choose JPEG.
This route is useful when an organizer has only a phone and needs to send a small set after a ceremony, match, or reception. It isn't the ideal workflow for a large professional gallery because file naming, folder control, quality verification, and metadata checks are harder on a small screen.
The iPhone's Camera > Formats setting also includes a more compatible capture option for future photos. That setting affects new captures, not existing HEIC images, so it won't solve a folder already imported from an event. For a working photographer, keeping the efficient capture format and generating delivery copies later usually offers more flexibility than changing the camera for every assignment.
Batch Processing and Windows Compatibility Fixes
Windows users often encounter the problem before they can even begin converting. HEIC support isn't included by default, so the Photos app may show an error or ask for an extension. The official HEIF Image Extensions are required before HEIC files open normally in the standard Windows environment, while Android handling varies by manufacturer and version, as explained in this current compatibility guide for HEIC and JPG.
Install the extension from a trusted Microsoft source, then test one original file. Opening the image confirms that the computer can decode it, but it doesn't prove that a batch converter will preserve orientation, color profiles, or EXIF fields. Those are separate checks.
A safe Windows batch routine
For a trade show or sports tournament, manual conversion through Paint or Photos is too easy to interrupt and too difficult to audit. Use a local batch tool that can process a folder, select JPEG as the output, preserve the folder structure where possible, and write to a new destination.
A practical sequence looks like this:
- Duplicate the source folder: Keep the imported HEIC files untouched, including their original filenames and subfolders.
- Create a delivery destination: Use a separate folder for JPGs, with a clear event name and set name.
- Select JPEG output: Choose a high quality setting rather than a small-file preset intended for thumbnails.
- Preserve metadata: Enable EXIF copying, orientation handling, and profile embedding if those options are available.
- Run a small batch first: Open representative images containing portraits, stage lighting, shadows, and bright outdoor areas.
- Inspect the result: Check image orientation, colors, filenames, dates, and location fields before processing the complete gallery.
- Upload copies only: Keep the HEIC folder available for later edits, print orders, or re-exporting.
Online converters can be convenient for an isolated, non-sensitive image, but private event portraits, identity documents, backstage images, and client material shouldn't be uploaded to an unverified server. Local conversion keeps the files on the production computer and avoids making privacy dependent on an unknown upload policy.
Organizing large deliveries
Batch conversion is more dependable when the source and destination are predictable. I use one folder for camera originals, one for edited masters, and one for web or attendee copies. I also avoid renaming files during the first conversion pass, because a stable filename makes it easier to compare the HEIC and JPG versions when something looks wrong.
Before importing the final copies into a gallery, open a selection from the beginning, middle, and end of the batch. If the event spans multiple cameras or memory cards, include an image from each source. A controlled photo upload workflow can then receive the verified JPG set instead of an untested mixture of formats.
Protecting Image Quality and Hidden Metadata
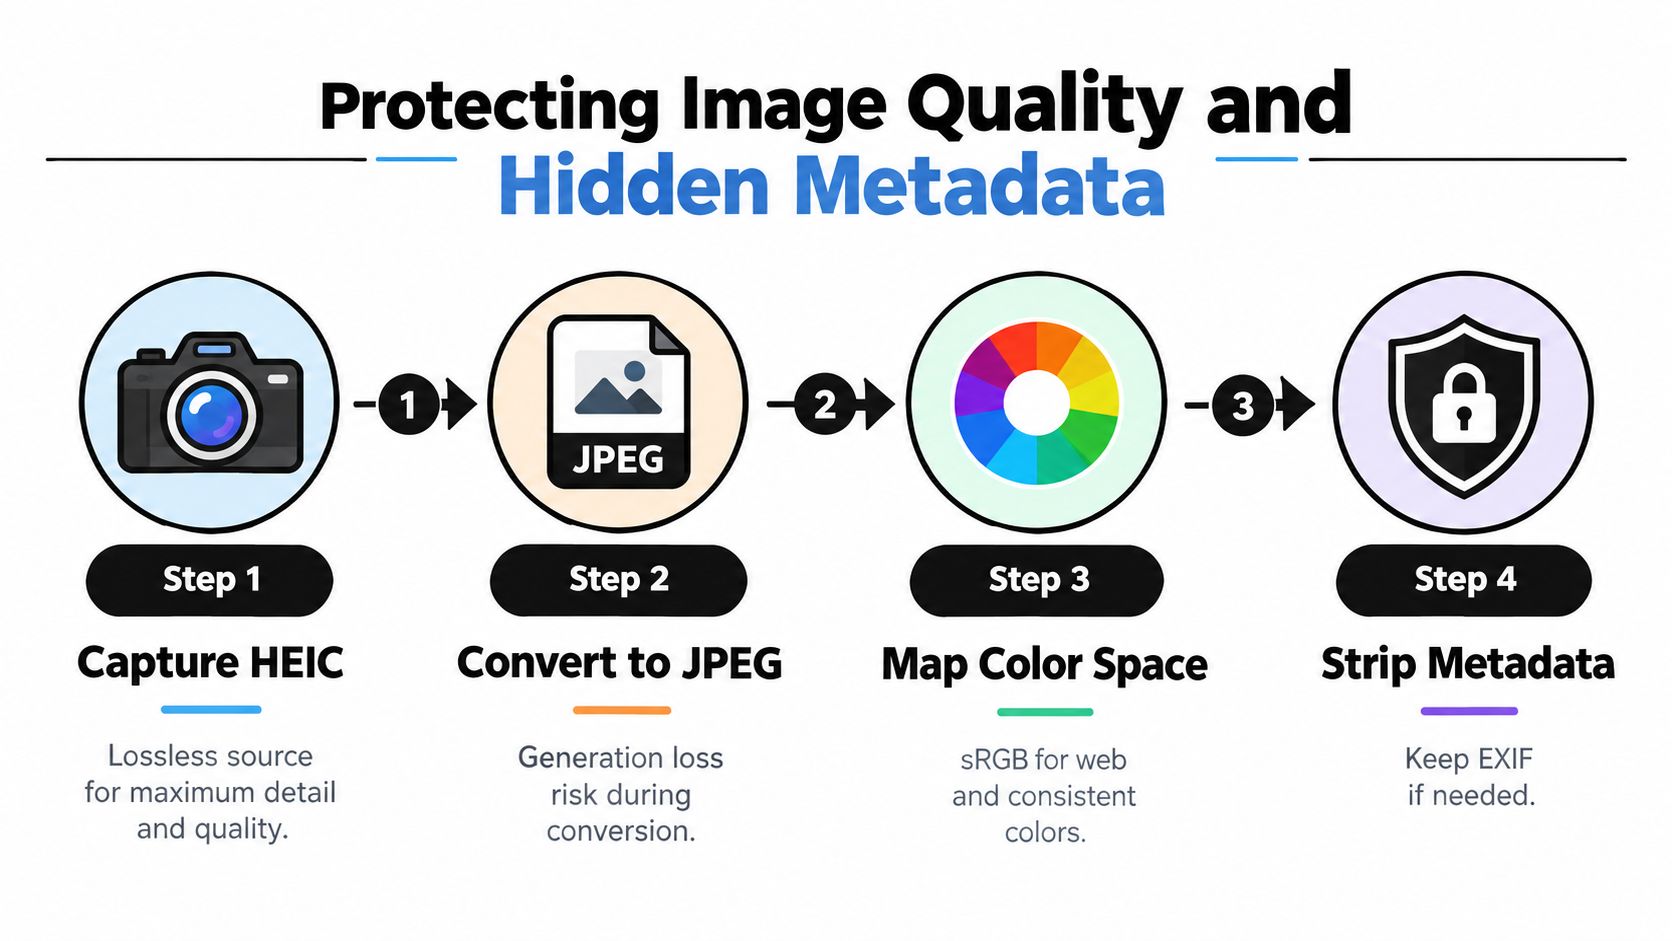
A converter can produce a JPG that opens everywhere while damaging the information a professional workflow needs. The visual image may look acceptable at a glance, but a missing timestamp can disrupt chronological sorting, a lost orientation flag can rotate portraits incorrectly, and an untagged color space can change the appearance of skin tones between devices.
HEIC-to-JPG conversion first decodes the HEVC or HEIC source into pixels and then re-encodes those pixels as JPEG. Because JPEG is also lossy, repeated conversions or continued editing of an already converted JPG can introduce generation loss. The safest pattern is one conversion at a high quality setting, followed by delivery from that copy, while the original HEIC remains the archival master.
Quality is more than a slider
For general event photographs, JPEG quality in the 90 to 95 range is a practical target, based on the conversion guidance supplied in the verified technical data. Lower settings, particularly those often used below roughly 80%, make blocking, banding, and texture loss more visible around sharp edges, gradients, hair, fabric, and stage lighting.
The file-size cost is real. Neutral benchmark reporting found that a quality-matched JPEG made from an iPhone-typical near-lossless HEIC was about 1.95 times the HEIC file size on median, with a range from 1.5 times to 2.9 times across images. The same reporting recommends embedding an sRGB ICC profile so downstream viewers and editors interpret colors consistently, as detailed in this technical report on HEIC conversion costs.
Map color correctly
Many iPhone images use the wide-gamut Display P3 color space. A proper conversion transforms those values into sRGB with suitable tone mapping. Interpreting Display P3 values as sRGB can make a gallery look washed out, oversaturated, or inconsistent across browsers and editing applications.
Look for conversion settings that mention color management, sRGB conversion, or ICC profile embedding. After conversion, compare a portrait with a saturated dress, a blue-lit stage, and a sunset or outdoor scene. Check the JPG in the application used for upload and in a regular browser, because a color issue may only appear after another system reads the file.
Preserve the fields that make galleries usable
Metadata is separate from visible quality. Depending on the source and the tool, EXIF may include the capture date, camera model, orientation, location, and camera settings. Some batch tools strip or mishandle those fields unless preservation is explicitly enabled.
Keep metadata when it supports internal sorting, search, rights management, or delivery records. Remove location data when privacy policy or attendee safety requires it, especially for private residences, schools, or restricted venues. After conversion, inspect a sample with an EXIF viewer and confirm the exact fields your gallery process needs.
Live Photo motion, depth maps, and transparency won't survive in an ordinary JPG. Export the still frame for universal sharing, but retain the original HEIC whenever motion, portrait effects, layered assets, print work, or future editing may matter. The gallery settings workflow should receive files that match the intended attendee experience, not merely files that happen to open.
Connecting Converted Galleries to Attendee Experiences
A compatible JPG is valuable because it removes friction at the point where attendees interact with the event photographer's work. The file should open quickly, display with consistent color, and carry enough metadata for the organizer or photographer to sort the gallery before distribution.
The best find my photos experience starts before the attendee receives a link. After conversion, group the files by event, confirm that the images are upright, remove accidental duplicates, and decide which sets are public, private, sponsor-approved, or restricted. The organizer should also establish permission rules for faces, location data, minors, and images intended for social sharing.
A modern event gallery can turn that prepared folder into a selfie photo matching workflow. Instead of asking every guest to scroll through a large gallery, the attendee opens a browser page, provides a selfie where appropriate, and receives the images associated with their appearance. That can make a face recognition event gallery more useful than a plain folder, provided the organizer controls consent, retention, access, and sharing settings.
The technical conversion still matters. A rotated image, missing capture date, or inconsistent color profile may not prevent matching, but it can make the final gallery feel unfinished. Correctly prepared JPGs also give attendees files they can download, repost, send through messaging apps, or use in a personal event recap without asking the photographer for another export.
A delivery page can be distributed through an event photo sharing link, email, SMS, WhatsApp, an event website, or a QR code photo gallery displayed at the venue. Those channels work best when the recipient reaches the relevant gallery immediately instead of navigating a generic storage folder. A photographer can make the private retrieval flow available through a controlled attendee access workflow, while the organizer decides which albums and downloads are enabled.
The result extends beyond convenience. Guests find their moments sooner, organizers can support post-event engagement without manually answering repeated requests, and photographers can create a clear path from capture to attendee sharing. That workflow also supports approved UGC from events, because people are more likely to repost a photo they can locate quickly and download in a familiar format.
Before publishing, test the full attendee journey on an iPhone, a Windows computer, and an Android device. Don't stop at confirming that the photographer can upload. Open the event photo sharing link, find a sample image, download it, and share it through the channel your guests are most likely to use.
Archiving Masters Versus Delivering Optimized Copies
An event gallery may be delivered as JPGs within hours, while the original HEIC files remain useful for years. Keep both versions. The HEIC master retains the efficient source for future editing and higher-value requests, while the JPG copy supports immediate viewing, sharing, and downloads across mixed devices.
HEIC also saves archive space. Apple's move to the format was reported to reduce photo storage by roughly 40 to 50 percent compared with JPEG, allowing the same device storage to hold about twice as many photos, as documented in this explanation of HEIC storage efficiency. That difference matters when an event includes several camera imports, selects, and edited versions.
Keep the source for future value
Store the original HEIC files in a protected master folder, with a second backup in a separate location. Keep edited high-resolution files apart from the JPG delivery folder, and record the export settings used for the attendee copies. If a client later requests a print, a different crop, a new color treatment, or a premium re-edit, you can return to the source instead of trying to improve a compressed delivery file.
Retain the HEIC when it includes a Live Photo component, depth information, or image data that may benefit from newer editing tools. JPEG delivery solves compatibility. It does not replace the original capture.
Optimize the copy for the audience
The JPG folder should contain only files approved for the gallery or download experience. Apply a consistent quality setting, convert to sRGB for predictable browser color, preserve approved metadata, and inspect representative images on the devices your attendees use. For a public gallery, remove GPS data when location privacy matters, while keeping dates and camera information in the internal archive.
| Archive masters | Delivery copies |
|---|---|
| Original HEIC files | JPEG files for broad compatibility |
| Future edits and print work | Browser viewing and attendee downloads |
| Full capture context where supported | Managed metadata and sRGB profile |
| Protected storage and backup | Gallery-ready folder with clear naming |
This dual-track workflow prevents two expensive mistakes. Delivering only HEIC can create compatibility complaints, while converting and deleting the originals removes options for future edits and print orders. Keep the efficient source, publish the accessible copy, and give each format a defined role.
Use a dedicated event photo workflow to turn verified JPGs into a branded gallery with a shareable link, QR code distribution, and selfie-based retrieval. Saucial lets photographers upload event photos, simplify the find my photos experience, and give guests a direct way to discover and share their moments.